
How To Make An Interactive PDF
This tutorial covers some of the basics of InDesign. Together we will go over a few of the program’s unique features, create some interactive elements, and publish our Interactive PDF online. In future tutorials, we will cover the more advanced features that the program has to offer. To see some fully featured Interactive PDFs, check out the examples on the All Things Hospitality website!
What We Will Cover
- Get To Know Your Tool
- Creating A Button
- Creating A Multi-State Object
- Connecting Our Button & MSO
- How To Publish Your Interactive PDF Online
Get to Know Your Tool – InDesign Introduction
Adobe InDesign is the industry standard tool for creating Interactive PDFs. There are other alternatives, but InDesign is the most robust and straightforward. If you’re at all familiar with other Adobe products like Photoshop or Illustrator, then you should have no problem coming to grips with its basic functions. That being said, it does have a few unique idiosyncrasies to keep in mind.
The most important thing to remember is that different workspaces give you quick access to specific features. The drop-down menu in the top right of the program allows you to switch between them. The Essentials Workspace is where you’ll be spending most of your time while creating the design and layout of your document. The Digital Publishing Workspace is for maximizing the benefit of interactive elements. This is where you will adjust Object State, create Buttons and Forms, and include Animation; all things that we will cover later in the tutorial.


I’ll assume that you’re using workspaces throughout this tutorial and will annotate when switching between them. If you dislike having to switch or have trouble remembering where a function resides in the future, then you can always use the Window menu to select specific items. Use whatever comes most naturally to you.
Creating A Multi-State Object

A Multi-State Object (MSO) is something that can change over time in your interactive PDF. For example, a slideshow of images that is controlled by a timer or button presses would be a MSO. You can make anything, including the buttons themselves, MSOs if you like. To keep things simple and get accustomed to our tools, we’re going to be making a large block that will change colors. In the Essentials Workspace, select the Rectangle Tool and draw a box on your artboard. Adjust the appearance in the Properties panel on the right.
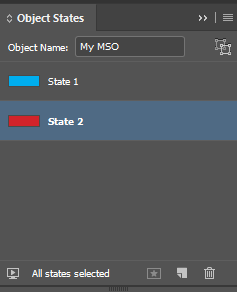
After designing the object, move to the Digital Publishing Workspace. Select the object and press the Object States option on the right panel. A new window will pop-up. Press the button near the bottom right that looks like a sticky note. You should see two different states, labeled accordingly, in the window. Make a name for your MSO and highlight State 2. The menu at the top of the screen will allow you to adjust the styling for this specific state. Make sure you have a different color for each state so that you will be able to tell when the object’s state changes. Now we need to have something that triggers a state change for our MSO!
Creating A Button

The easiest way to create a button is by making a styled text box. In the Essentials Workspace, select the Type Tool, make a box anywhere on the artboard, and add some descriptive text. Feel free to adjust the settings in the Properties panel on the right to style it however you like. The PDF document format allows you total creative freedom with your design choices. Our goal with this tutorial is to cover functionality so we will not be covering all of the unique formatting options.
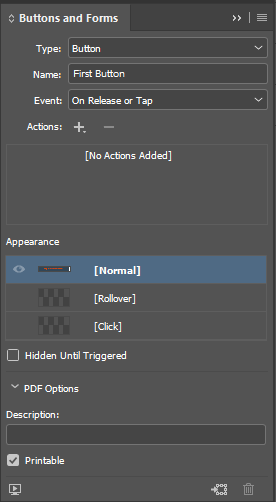
Once you’re satisfied with the look of your button, switch over to the Digital Publishing Workspace. With your text box selected, press the Buttons and Forms option on the right side panel. A new panel will open with a dropdown menu titled Type. You’ll see many options including Check Box, Combo Box, List Box, Radio Button, Signature Field, and Text Field. Select the top option, Button, and create a name for your new button.
Connecting Our Button and MSO
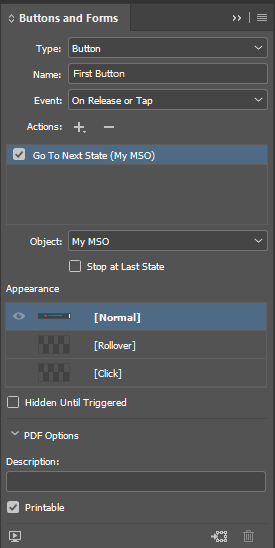
To make our button functional, we need to describe what action to take when a certain event occurs. Each of the options in the dropdown labeled Event can have multiple Actions attached to it. Below is a list of what each Event means:
- On Release Or Tap – When a user releases the mouse button after clicking or touches the button and lifts their finger on a touch screen device.
- On Click – Immediately after clicking down with a mouse button or touching with a finger.
- On Roll Over – When the mouse icon hovers over the button
- On Roll Off – When the mouse icon leaves the button
We are going to be using On Release Or Tap for our purposes. The difference between Release Or Tap and On Click is subtle but important. Using On Release Or Tap is the more common usage and is more user-friendly on touch screen devices. Next, to the Actions label select the `+` icon and select Go To Next State. Notice that InDesign will autofill the Object field with the MSO that we created earlier. When dealing with more complex documents, it’s important to make sure that the correct MSO is selected. To test if your button is working as desired, you can press the icon on the bottom left of the Buttons and Forms window. If everything is working, it’s time to publish our document and share it with the world!
How To Publish Your Interactive PDF Online
In the top-right portion of the InDesign screen press the Publish Online button. Make a title for your document and fill in a description. Once you’re finished, press the blue Publish button. It takes a few moments for Adobe to process your document depending on file size. Once complete you can view your document online. Congratulations! You’ve made a functioning, interactive PDF that you can share with anyone in the world! Our version of the example is located here if you’d like to compare results.
Interactive PDFs are an amazing and underutilized digital marketing tool. You’ve just touched the tip of the iceberg in what you’re capable of doing with InDesign. In future installments, we will cover some of the more advanced and powerful tools that will let you create stunning sales pieces. This catering menu has some features that we will be covering next time like page transitions and hyperlink buttons.